The basic patter recognition and classification with openCV
In this tutorial we go to introduce to the pattern recognitions basics in openCV.
In pattern recognitions before we can classificate an element we need train our system. We go to train with 3 class with 100 samples each one.
Then we create 2 matrix trainData and traninClasses with 300 samples:
int train_sample_count = 300;
CvRNG rng_state = cvRNG(-1);
CvMat* trainData = cvCreateMat( train_sample_count, 2, CV_32FC1 );
CvMat* trainClasses = cvCreateMat( train_sample_count, 1, CV_32FC1 );
Where our 100 first data are class 1, the range 100 to 200 are class 2 and last 100 data are class 3, then we set our trainClasses matrix data:
cvGetRows( trainClasses, &trainClasses1, 0, 100 );
cvSet( &trainClasses1, cvScalar(1) );cvGetRows( trainClasses, &trainClasses2, 100, 200 );
cvSet( &trainClasses2, cvScalar(2) );cvGetRows( trainClasses, &trainClasses3, 200, 300 );
cvSet( &trainClasses3, cvScalar(3) );
cvGetRows function set a CvMat structure (matrix structure) with selected rows of source matrix.
cvGetRows( srcMatrix, destMatrix, first_row, last_row );
And set all rows to dest class witn cvSet, this function set all values of matrix to a scalar
cvSet( matrix, cv_scalar_value );
We go to use in this tutorial a random normalized sample in 2D (2D gaussian mixture) that we generate in openCV with cvRandArr function. For create data sample we need create to cvRandArr, one for x values and other for y values.
//Train sample class 1
cvGetRows( trainData, &trainData1, 0, 100 );
cvGetCol( &trainData1, &colData1x, 0);
cvGetCol( &trainData1, &colData1y, 1);
cvRandArr( &rng_state, &colData1x, CV_RAND_NORMAL, cvScalar(200), cvScalar(50) );
cvRandArr( &rng_state, &colData1y, CV_RAND_NORMAL, cvScalar(200), cvScalar(50) );
//Train sample class 2
cvGetRows( trainData, &trainData2, 100, 200 );
cvGetCol( &trainData2, &colData2x, 0);
cvGetCol( &trainData2, &colData2y, 1);
cvRandArr( &rng_state, &colData2x, CV_RAND_NORMAL, cvScalar(300), cvScalar(50) );
cvRandArr( &rng_state, &colData2y, CV_RAND_NORMAL, cvScalar(300), cvScalar(50) );
//Train sample class 3
cvGetRows( trainData, &trainData3, 200, 300 );
cvGetCol( &trainData3, &colData3x, 0);
cvGetCol( &trainData3, &colData3y, 1);
cvRandArr( &rng_state, &colData3x, CV_RAND_NORMAL, cvScalar(100), cvScalar(30) );
cvRandArr( &rng_state, &colData3y, CV_RAND_NORMAL, cvScalar(400), cvScalar(30) );
Now we can train our classifier. In this basic tutorial, we go to use the k nearest neighbour classifier.
This classifier is the most simplest but it's used in more cases. This algorithm classify an object by a majority vote of its nearest neighbors.
Then we use CvKNearest openCV class
CvKNearest knn( trainData, trainClasses, 0, false, K );
Where first parameter is train data, second the classes, and last parameter is the nomber of k-neighbour value with maximum value is 32.
Now we have in knn instance a k-nn classifier. Now if we want know in wich class is classified point only need call knn.find_nearest and return the nearest class.
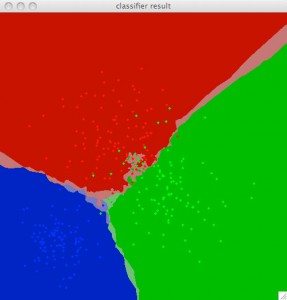
Then we go to classify a values for range [0,0] to [500,500] this our classifier, this is the result:
Red points: Train data of class 1.
Green points: Train data of class 2.
Blue points: Train data of class 3.
Red area: classify as class 1 with more than 5 neighbours in class 1
Light red area: classify as class 1 with less than 5 neighbours in class 1
Green area: classify as class 2 with more than 5 neighbours in class 2
Light green area: classify as class 2 with less than 5 neighbours in class 2
Blue area: classify as class 3 with more than 5 neighbours in class 3
Light blue area: classify as class 2 with less than 5 neighbours in class 2
Orange area: don't classify
