<?xml version="1.0" encoding="utf-8"?><feed xmlns="http://www.w3.org/2005/Atom" ><generator uri="https://jekyllrb.com/" version="3.9.5">Jekyll</generator><link href="http://blog.damiles.com/feed.xml" rel="self" type="application/atom+xml" /><link href="http://blog.damiles.com/" rel="alternate" type="text/html" /><updated>2024-07-05T11:18:16+00:00</updated><id>http://blog.damiles.com/feed.xml</id><title type="html">Damiles Blog</title><subtitle>An awesome IT blog where i write about computer vision, image processing servers, amazon AWS, Artificial intelligence, Virtual and Augmented reality, OCR and more. 
</subtitle><entry><title type="html">Tfrecords and TFRecordDataset. Your friends to performance data access on Google Cloud ML</title><link href="http://blog.damiles.com/2018/06/18/tensorflow-tfrecodataset.html" rel="alternate" type="text/html" title="Tfrecords and TFRecordDataset. Your friends to performance data access on Google Cloud ML" /><published>2018-06-18T06:59:29+00:00</published><updated>2018-06-18T06:59:29+00:00</updated><id>http://blog.damiles.com/2018/06/18/tensorflow-tfrecodataset</id><content type="html" xml:base="http://blog.damiles.com/2018/06/18/tensorflow-tfrecodataset.html"><![CDATA[<p><img src="/assets/2018/performance-data-gs-tfrecords-init.png" alt="TFRecords performance" /></p>

<p>TensorFlow is an awesome framework where deploy deeplearning. Actually i’m working very hard on it and exploring all benefits and powerful. Then i started to deploy the models on <a href="https://cloud.google.com" target="_blank">Google Cloud</a>. Google cloud is an awesome cloud solution where there are multiple services for all clouds needs. One of its tools very important for Deep Learning developers is <a href="https://cloud.google.com/ml-engine" target="_blank">Google Cloud Machine Learning</a> that allow train our models very cheaper in high performance computers.</p>

<p>Then i put my hands to work on. As a computer vision developer i create my CSV file that store all file image uris and the class for each one. And following the tutorials, first i deploy and test the algorithm locally. All works fine and in few minutes i get the results. Then i started to deploy on the cloud and i upload all my png files and the CSV file for train and test to <a href="https://cloud.google.com/storage" target="_blank">Google Storage</a>.</p>

<p>After finish to upload my 60k images for training and 10k for test from MNIST to google storage, i execute with the simple command line that google provide my tensorflow python scripts, tested locally. After wait more than 20 minutes i knew that something wrong is happening. Why locally with a laptop in few minutes i had results and in a powerful machine on google cloud was not working? Then i asked to me what could be the main issues:</p>

<ol>
  <li>The Google Storage is in other region of my Google ML.</li>
  <li>I have some issue on my code</li>
</ol>

<p>After check that the google storage and google ML are on same region and are correctly setup and my code is fine the i start to be crazy…. What happens? Why it’s so slow to give me some output?.</p>

<p><img src="https://media.giphy.com/media/2qj6bUKROWNkQ/giphy.gif" alt="Whats happening" /></p>

<p>Then i start to debug… Any TensorFlow developer knows that debug on it is very complex and dificult then i thought that TensorFlow and Google can think on this and give some tool to inspect the performance of a TensorFlow code and… BANG there is a function to do it. My new friend is called <a href="https://www.tensorflow.org/api_docs/python/tf/train/ProfilerHook" target="_blank">ProfilerHook</a>. And adding the small snippet of code to my code</p>

<figure class="highlight"><pre><code class="language-python" data-lang="python"><span class="n">profiler_hook</span> <span class="o">=</span> <span class="n">hooks</span><span class="p">.</span><span class="n">ProfilerHook</span><span class="p">(</span><span class="n">save_steps</span><span class="o">=</span><span class="mi">10</span><span class="p">,</span> <span class="n">output_dir</span><span class="o">=</span><span class="n">args</span><span class="p">.</span><span class="n">job_dir</span><span class="p">)</span>
<span class="n">classifier</span><span class="p">.</span><span class="n">train</span><span class="p">(</span><span class="n">input_fn</span><span class="o">=</span><span class="n">model</span><span class="p">.</span><span class="n">data_train_estimator</span><span class="p">,</span> <span class="n">steps</span><span class="o">=</span><span class="mi">20000</span><span class="p">,</span> <span class="n">hooks</span><span class="o">=</span><span class="p">[</span><span class="n">profiler_hook</span><span class="p">])</span></code></pre></figure>

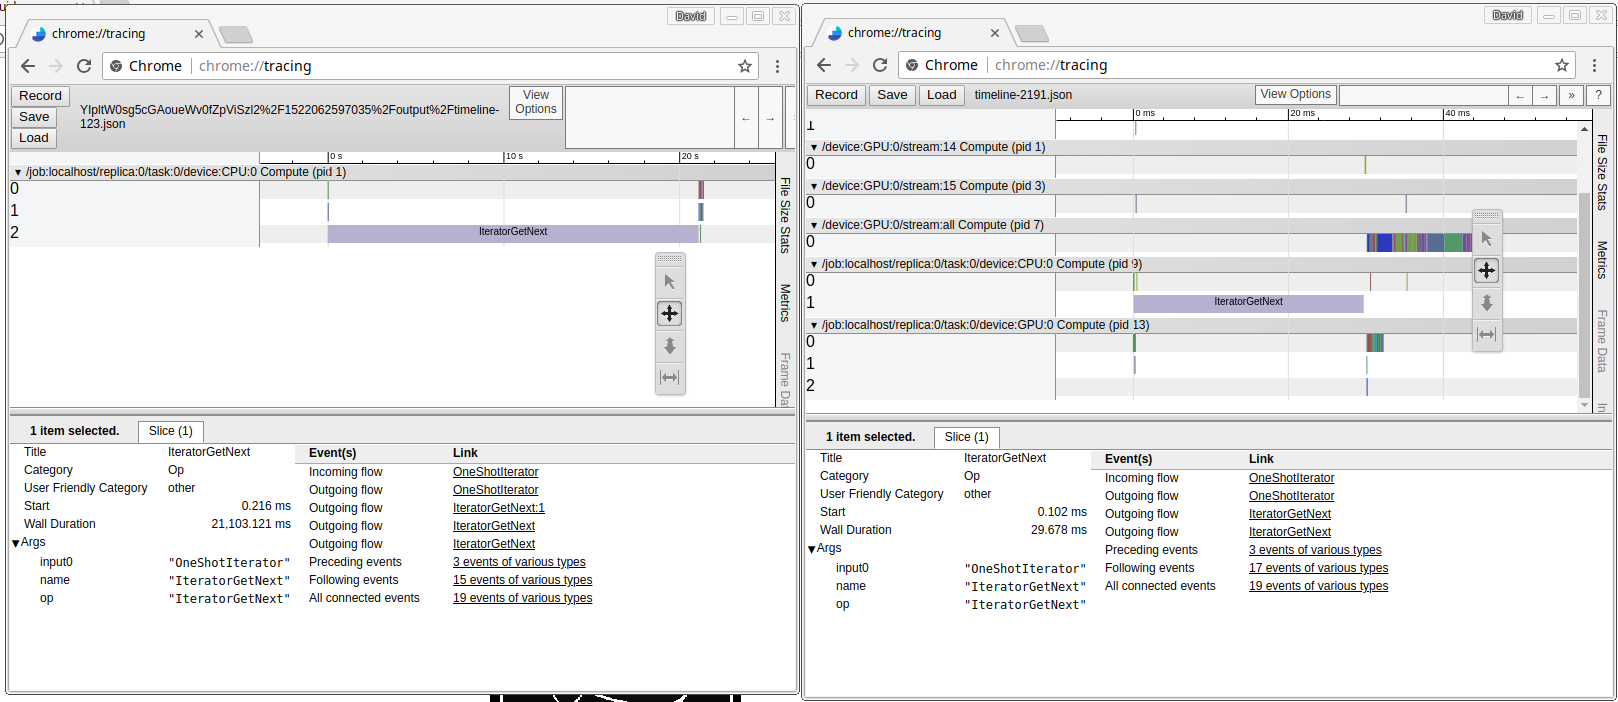
<p>First i test locally and get the first results and explore with chrome://tracing. All seems fine. Then upload to Google Cloud ML and wait, wait… and i have the first log on my google storage from profiler… and open it side by side to my local profiler to compare… See image to see the results:</p>

<p><img src="/assets/2018/performance-data-gs.png" alt="Google Storage vs SSD Storage" /></p>

<p>Oh my God! My local version execute the iteratorGetNext in 29ms and in google cloud is 21.103ms 20seconds!! one step batch 20 seconds. I set around 20000 steps or epochs to train, this means that in my local version tooks around 10min to get all batchs plus process the training, around 15minuts to get the result, something reasonable. But in google cloud tooks around 111hours!!!! only get the batchs…</p>

<p>The issue then is the access to each image to google storage, that tooks around 500ms each one to open put on memory and close…. Then, what could be the solutions? Don’t access to google storate so many times to access to data.Then we can convert our big amount of files in one single file using nunpy single file, that could be a solution or use the <em>tfrecord</em> and load using <em>tfrecorddataset</em> and avoid to use a third dependency if it’s not required.</p>

<p>I search on google how to convert a CSV file with filename and class to tfrecord file and finally i create my own:</p>

<figure class="highlight"><pre><code class="language-python" data-lang="python"><span class="kn">import</span> <span class="nn">tensorflow</span> <span class="k">as</span> <span class="n">tf</span>
<span class="kn">import</span> <span class="nn">pandas</span> <span class="k">as</span> <span class="n">pd</span>
<span class="kn">from</span> <span class="nn">IPython.display</span> <span class="kn">import</span> <span class="n">clear_output</span>

<span class="k">def</span> <span class="nf">_bytes_feature</span><span class="p">(</span><span class="n">value</span><span class="p">):</span>
    <span class="k">return</span> <span class="n">tf</span><span class="p">.</span><span class="n">train</span><span class="p">.</span><span class="n">Feature</span><span class="p">(</span><span class="n">bytes_list</span><span class="o">=</span><span class="n">tf</span><span class="p">.</span><span class="n">train</span><span class="p">.</span><span class="n">BytesList</span><span class="p">(</span><span class="n">value</span><span class="o">=</span><span class="p">[</span><span class="n">value</span><span class="p">]))</span>

<span class="k">def</span> <span class="nf">_int64_feature</span><span class="p">(</span><span class="n">value</span><span class="p">):</span>
    <span class="k">return</span> <span class="n">tf</span><span class="p">.</span><span class="n">train</span><span class="p">.</span><span class="n">Feature</span><span class="p">(</span><span class="n">int64_list</span><span class="o">=</span><span class="n">tf</span><span class="p">.</span><span class="n">train</span><span class="p">.</span><span class="n">Int64List</span><span class="p">(</span><span class="n">value</span><span class="o">=</span><span class="p">[</span><span class="n">value</span><span class="p">]))</span>

<span class="k">def</span> <span class="nf">create_tfrecords_from_csv</span><span class="p">(</span><span class="n">csv_file</span><span class="p">,</span> <span class="n">output_file</span><span class="p">):</span>
    <span class="n">tfrecords_filename</span> <span class="o">=</span> <span class="n">output_file</span>
    <span class="n">writer</span> <span class="o">=</span> <span class="n">tf</span><span class="p">.</span><span class="n">python_io</span><span class="p">.</span><span class="n">TFRecordWriter</span><span class="p">(</span><span class="n">tfrecords_filename</span><span class="p">)</span>

    <span class="n">csv_file_records</span><span class="o">=</span> <span class="n">pd</span><span class="p">.</span><span class="n">read_csv</span><span class="p">(</span><span class="n">csv_file</span><span class="p">,</span> <span class="n">header</span><span class="o">=</span><span class="bp">None</span><span class="p">,</span> <span class="n">names</span><span class="o">=</span><span class="p">[</span><span class="s">'file'</span><span class="p">,</span> <span class="s">'class'</span><span class="p">])</span>
    <span class="n">total_rows</span><span class="o">=</span> <span class="n">csv_file_records</span><span class="p">[</span><span class="s">'class'</span><span class="p">].</span><span class="n">count</span><span class="p">()</span>
    <span class="k">for</span> <span class="n">index</span><span class="p">,</span> <span class="n">row</span> <span class="ow">in</span> <span class="n">csv_file_records</span><span class="p">.</span><span class="n">iterrows</span><span class="p">():</span>
        <span class="n">clear_output</span><span class="p">(</span><span class="n">wait</span><span class="o">=</span><span class="bp">True</span><span class="p">)</span>
        <span class="k">print</span> <span class="n">index</span><span class="p">,</span> <span class="s">'of'</span><span class="p">,</span> <span class="n">total_rows</span>
        <span class="n">label</span><span class="o">=</span> <span class="n">row</span><span class="p">[</span><span class="s">'class'</span><span class="p">]</span>
        <span class="n">img</span><span class="o">=</span> <span class="n">io</span><span class="p">.</span><span class="n">imread</span><span class="p">(</span><span class="n">row</span><span class="p">[</span><span class="s">'file'</span><span class="p">])</span>
        <span class="n">h</span><span class="o">=</span> <span class="n">img</span><span class="p">.</span><span class="n">shape</span><span class="p">[</span><span class="mi">0</span><span class="p">]</span>
        <span class="n">w</span><span class="o">=</span> <span class="n">img</span><span class="p">.</span><span class="n">shape</span><span class="p">[</span><span class="mi">1</span><span class="p">]</span>
        
        <span class="n">img_raw</span><span class="o">=</span> <span class="n">img</span><span class="p">.</span><span class="n">tostring</span><span class="p">()</span>
    
        <span class="n">example</span><span class="o">=</span> <span class="n">tf</span><span class="p">.</span><span class="n">train</span><span class="p">.</span><span class="n">Example</span><span class="p">(</span><span class="n">features</span><span class="o">=</span> <span class="n">tf</span><span class="p">.</span><span class="n">train</span><span class="p">.</span><span class="n">Features</span><span class="p">(</span><span class="n">feature</span><span class="o">=</span><span class="p">{</span>
            <span class="s">'label'</span><span class="p">:</span> <span class="n">_int64_feature</span><span class="p">(</span><span class="n">label</span><span class="p">),</span>
            <span class="s">'height'</span><span class="p">:</span> <span class="n">_int64_feature</span><span class="p">(</span><span class="n">h</span><span class="p">),</span>
            <span class="s">'width'</span><span class="p">:</span> <span class="n">_int64_feature</span><span class="p">(</span><span class="n">w</span><span class="p">),</span>
            <span class="s">'image_raw'</span><span class="p">:</span> <span class="n">_bytes_feature</span><span class="p">(</span><span class="n">img_raw</span><span class="p">)</span>
        <span class="p">}))</span>
    
        <span class="n">writer</span><span class="p">.</span><span class="n">write</span><span class="p">(</span><span class="n">example</span><span class="p">.</span><span class="n">SerializeToString</span><span class="p">())</span>

    <span class="n">writer</span><span class="p">.</span><span class="n">close</span><span class="p">()</span>
    
<span class="n">create_tfrecords_from_csv</span><span class="p">(</span><span class="s">'train.csv'</span><span class="p">,</span> <span class="s">'train.tfrecords'</span><span class="p">)</span></code></pre></figure>

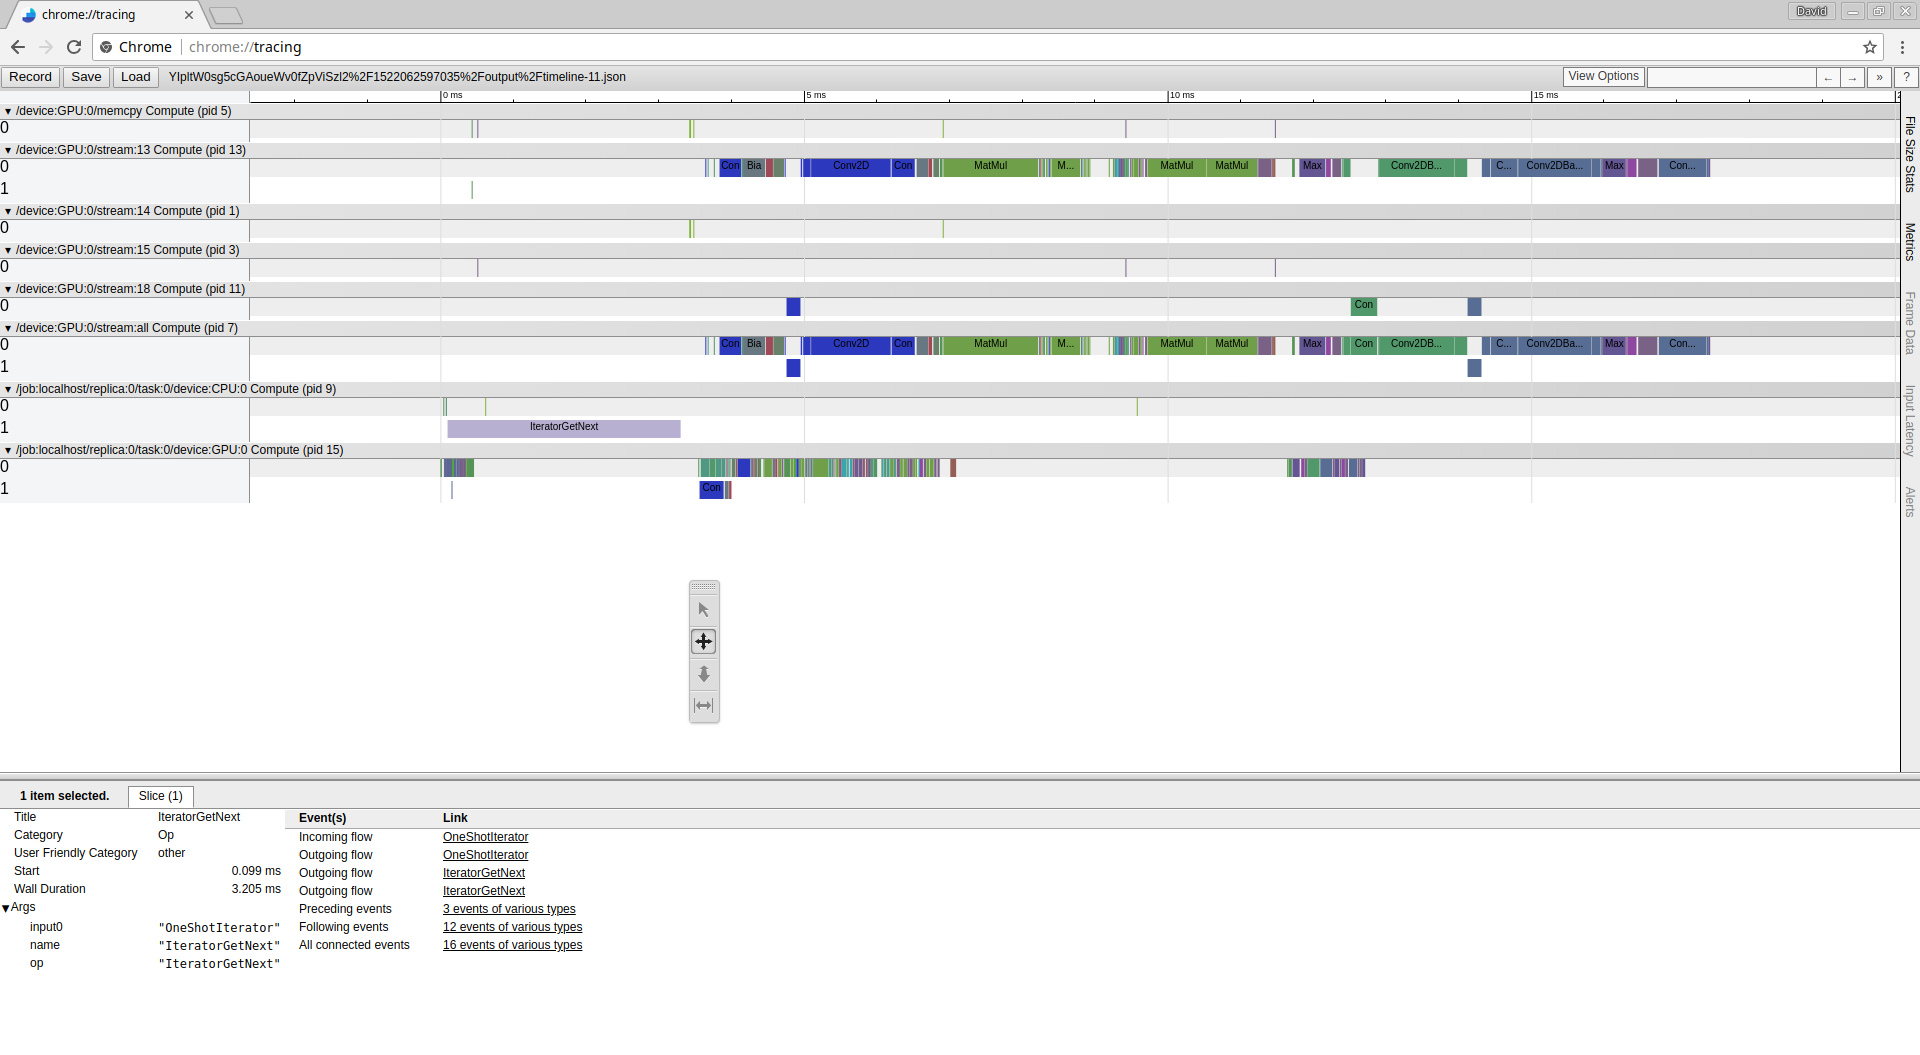
<p>After execute the script locally and convert all my images dataset in one single file train.tfrecords i upload the file to google storage and execute and evaluate the performance and get the following result:</p>

<p><img src="/assets/2018/performance-data-gs-tfrecords.png" alt="TFRecords performance" /></p>

<p>Awesome now it’s very fast, and as i expected more fast than access to thousand files locally, now it’s only 3ms every iterator, more less than the 20seconds and more less than local storage SSD that whas 29ms. It’s 10x more fast than SSD disk and more than 6000x on GS.</p>]]></content><author><name>{&quot;display_name&quot;=&gt;&quot;damiles&quot;, &quot;login&quot;=&gt;&quot;admin&quot;, &quot;email&quot;=&gt;&quot;david.millan@damiles.com&quot;, &quot;url&quot;=&gt;&quot;&quot;}</name><email>david.millan@damiles.com</email></author><summary type="html"><![CDATA[]]></summary></entry><entry><title type="html">Interpolation basic algorithms</title><link href="http://blog.damiles.com/2017/06/28/interpolation-basics.html" rel="alternate" type="text/html" title="Interpolation basic algorithms" /><published>2017-06-28T20:59:29+00:00</published><updated>2017-06-28T20:59:29+00:00</updated><id>http://blog.damiles.com/2017/06/28/interpolation-basics</id><content type="html" xml:base="http://blog.damiles.com/2017/06/28/interpolation-basics.html"><![CDATA[<p>It’s ineresting know how works the interpolation algorithms applied to images, in this article we are going to explore basically the most common interpolation algorithms that are: Nearest, bilinear and bicubic interpolations and their formulas.</p>

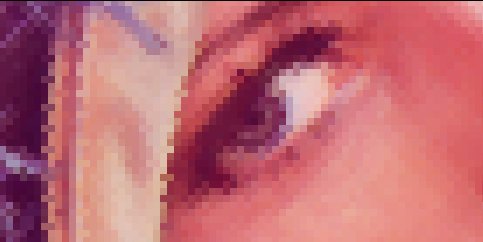
<p>To show the artifacts of interpolations we scaled the images to show better how to affect the interpolations</p>

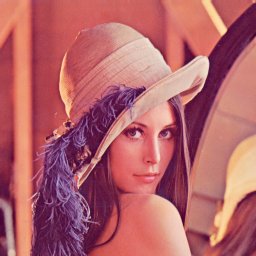
<p>Original image:
<img src="/assets/2017/06/Lena_std.jpg" alt="Original image" /></p>

<p>Nearest interpolation
<img src="/assets/2017/06/Nearest.jpg" alt="Nearest interpolation" /></p>

<p>Bilinear interpolation
<img src="/assets/2017/06/Bilinear.jpg" alt="Bilinear interpolation" /></p>

<p>Bicubic interpolation
<img src="/assets/2017/06/Bicubic.jpg" alt="Bicubic interpolation" /></p>

<h2 id="nearest-pixel-interpolation">Nearest pixel interpolation</h2>

<p>This is the simplest and fastest way to calculate the value of pixel. This consists in getting the nearest pixel corresponding to the original image.</p>

<p>If the result of inverse function get the pixel (0.3,0) then we get the value (0,0), and if we get the pixel (0.7,0) we get the value of pixel (1,0).</p>

<p>This is the fastest algorithm but it makes a pixeled image.</p>

<p>Original:</p>

<p><img src="/assets/2017/06/Lena_std.jpg" alt="" /></p>

<p>Result:</p>

<p><img src="/assets/2017/06/Nearest.jpg" alt="" /></p>

<h1 id="bilinear-pixel-interpolation">Bilinear pixel interpolation</h1>

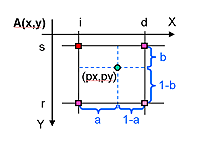
<p>This method of interpolation consists in tracing a line between the low and high rounded value of returned inverse function and calculate the resultant value with the line function.</p>

<p><img src="/assets/2017/06/Bilinear_scale_node.gif" alt="" /></p>

<p>The formula:</p>
<div class="language-plaintext highlighter-rouge"><div class="highlight"><pre class="highlight"><code>A’(px, py) = (1-a)(1-b)A(s, i) + a(1-b)A(s, d) +(1-a)bA(r, i) + abA(r, d) 
</code></pre></div></div>

<p>Original:</p>

<p><img src="/assets/2017/06/Lena_std.jpg" alt="" /></p>

<p>Result:</p>

<p><img src="/assets/2017/06/Bilinear.jpg" alt="" /></p>

<h2 id="bicubic-pixel-interpolation">Bicubic pixel interpolation</h2>

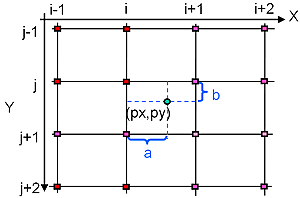
<p>This method produces the better result but is the slowest algorithm. It calcules the value with a cubic curve with the 4 neighbour pixels.</p>

<p><img src="/assets/2017/06/Bicubic_scale_node.gif" alt="" /></p>

<p>The formula:</p>

<p><img src="/assets/2017/06/Equation1.gif" alt="" /></p>

<p><img src="/assets/2017/06/Equation2.gif" alt="" /></p>

<p><img src="/assets/2017/06/Equation3.gif" alt="" /></p>

<p>Original:</p>

<p><img src="/assets/2017/06/Lena_std.jpg" alt="" /></p>

<p>Result:</p>

<p><img src="/assets/2017/06/Bicubic.jpg" alt="" /></p>]]></content><author><name>{&quot;display_name&quot;=&gt;&quot;damiles&quot;, &quot;login&quot;=&gt;&quot;admin&quot;, &quot;email&quot;=&gt;&quot;david.millan@damiles.com&quot;, &quot;url&quot;=&gt;&quot;&quot;}</name><email>david.millan@damiles.com</email></author><summary type="html"><![CDATA[It’s ineresting know how works the interpolation algorithms applied to images, in this article we are going to explore basically the most common interpolation algorithms that are: Nearest, bilinear and bicubic interpolations and their formulas.]]></summary></entry><entry><title type="html">Mail Sent error 550 5.1.1 Recipient address rejected: User unknown in virtual mailbox table</title><link href="http://blog.damiles.com/2013/02/11/mail-sent-error-550-5-1-1-recipient-address-rejected-user-unknown-in-virtual-mailbox-table.html" rel="alternate" type="text/html" title="Mail Sent error 550 5.1.1 Recipient address rejected: User unknown in virtual mailbox table" /><published>2013-02-11T14:36:42+00:00</published><updated>2013-02-11T14:36:42+00:00</updated><id>http://blog.damiles.com/2013/02/11/mail-sent-error-550-5-1-1-recipient-address-rejected-user-unknown-in-virtual-mailbox-table</id><content type="html" xml:base="http://blog.damiles.com/2013/02/11/mail-sent-error-550-5-1-1-recipient-address-rejected-user-unknown-in-virtual-mailbox-table.html"><![CDATA[<p>I have some webservers and hundred of domains, and the other day i create 4 domains for a customer, and 2 of the domains have in same machine the emails, and the other 2 in thirth party servers as Gmail o Yahoo, and when user send email from one of 2 servers to other externals server get this error:</p>

<blockquote><p>Plesk NOQUEUE: reject: RCPT from localhost[127.0.0.1]: 550 5.1.1 : Recipient address rejected: User unknown in virtual mailbox table; gmail</p></blockquote>
<p>I search for solution and the problem is that the server try to send email, but postfix and plesk configured the mail for external email in same server, and then don't work correctly, the solution is disable each mail internal server for external domain mail servers:</p>
<blockquote><p>/usr/local/psa/bin/domain -u mydomain.com -mail_service false</p></blockquote>]]></content><author><name>{&quot;display_name&quot;=&gt;&quot;damiles&quot;, &quot;login&quot;=&gt;&quot;admin&quot;, &quot;email&quot;=&gt;&quot;david.millan@damiles.com&quot;, &quot;url&quot;=&gt;&quot;&quot;}</name><email>david.millan@damiles.com</email></author><summary type="html"><![CDATA[I have some webservers and hundred of domains, and the other day i create 4 domains for a customer, and 2 of the domains have in same machine the emails, and the other 2 in thirth party servers as Gmail o Yahoo, and when user send email from one of 2 servers to other externals server get this error:]]></summary></entry><entry><title type="html">Mastering OpenCV with Practical Computer Vision Projects</title><link href="http://blog.damiles.com/2012/12/18/mastering-opencv-with-practical-computer-vision-projects.html" rel="alternate" type="text/html" title="Mastering OpenCV with Practical Computer Vision Projects" /><published>2012-12-18T09:08:12+00:00</published><updated>2012-12-18T09:08:12+00:00</updated><id>http://blog.damiles.com/2012/12/18/mastering-opencv-with-practical-computer-vision-projects</id><content type="html" xml:base="http://blog.damiles.com/2012/12/18/mastering-opencv-with-practical-computer-vision-projects.html"><![CDATA[<p>Announcing the new "Mastering OpenCV" book that I co-authored!</p>
<p>The book "Mastering OpenCV with Practical Computer Vision Projects" is now for sale from Packt Publishing with free shipping to many countries! Each chapter is a separate project containing step-by-step tutorials + full source-code using the latest C++ interface of OpenCV v2.4, written by 7 authors that are well-known among the OpenCV community for their blogs &amp; open-source projects.</p>

<p>Chapters (each is a project with full source-code):<br />
- Cartoonifier and Skin Changer for Android.<br />
- Marker-based Augmented Reality on iPhone or iPad.<br />
- Marker-less Augmented Reality.<br />
- Exploring Structure from Motion using OpenCV.<br />
- Number Plate Recognition using SVM and Neural Networks.<br />
- Non-rigid Face Tracking.<br />
- 3D Head Pose Estimation using AAM and POSIT.<br />
- Face Recognition using Eigenfaces or Fisherfaces.<br />
- Developing Fluid Wall using the Microsoft Kinect.</p>
<p>Authors (in alphabetical order):<br />
- Daniel Lélis Baggio ("<a href="http://code.google.com/p/ehci/">http://code.google.com/p/ehci/</a>")<br />
- Shervin Emami ("<a href="http://www.shervinemami.info/openCV.html">http://www.shervinemami.info/openCV.html</a>")<br />
- David Millán Escrivá ("<a href="http://blog.localhost/">http://blog.localhost/</a>")<br />
- Khvedchenia Ievgen ("<a href="http://computer-vision-talks.com/">http://computer-vision-talks.com/</a>")<br />
- Naureen Mahmood ("<a href="http://howdweknows.blogspot.com/">http://howdweknows.blogspot.com/</a>")<br />
- Jason Saragih ("<a href="http://jsaragih.org/">http://jsaragih.org/</a>")<br />
- Roy Shilkrot ("<a href="http://www.morethantechnical.com/">http://www.morethantechnical.com/</a>")</p>
<p>The book can be purchased from "<a href="http://www.packtpub.com/cool-projects-with-opencv/book">http://www.packtpub.com/cool-projects-with-opencv/book</a>" either as a physical book or as a PDF eBook.</p>
<p>The latest code can be downloaded from "<a href="https://github.com/MasteringOpenCV/code">https://github.com/MasteringOpenCV/code</a>", including a screenshot of each project (scroll down on the front page).</p>
<p>Note: You should already have basic experience with OpenCV and C/C++ before reading this book, as this book does not explain the basics of OpenCV and it assumes you already have it installed. For example, you could read the "Learning OpenCV" book and/or the "OpenCV 2 Cookbook" to learn the basics of OpenCV, then read this "Mastering OpenCV" book for more advanced skills and project ideas!<img class="alignnone" title="Mastering OpenCV with practical computer vision projects" src="http://www.packtpub.com/sites/default/files/7829OS_Mastering%20OpenCV%20with%20Practical%20Computer%20Vision%20Projects.jpg" alt="Mastering OpenCV with practical computer vision projects" width="500" height="617" /></p>]]></content><author><name>{&quot;display_name&quot;=&gt;&quot;damiles&quot;, &quot;login&quot;=&gt;&quot;admin&quot;, &quot;email&quot;=&gt;&quot;david.millan@damiles.com&quot;, &quot;url&quot;=&gt;&quot;&quot;}</name><email>david.millan@damiles.com</email></author><summary type="html"><![CDATA[Announcing the new "Mastering OpenCV" book that I co-authored! The book "Mastering OpenCV with Practical Computer Vision Projects" is now for sale from Packt Publishing with free shipping to many countries! Each chapter is a separate project containing step-by-step tutorials + full source-code using the latest C++ interface of OpenCV v2.4, written by 7 authors that are well-known among the OpenCV community for their blogs &amp; open-source projects.]]></summary></entry><entry><title type="html">Gnuplot Cookbook</title><link href="http://blog.damiles.com/2012/03/14/gnuplot-cookbook.html" rel="alternate" type="text/html" title="Gnuplot Cookbook" /><published>2012-03-14T15:20:33+00:00</published><updated>2012-03-14T15:20:33+00:00</updated><id>http://blog.damiles.com/2012/03/14/gnuplot-cookbook</id><content type="html" xml:base="http://blog.damiles.com/2012/03/14/gnuplot-cookbook.html"><![CDATA[<p style="text-align: center;"><a href="http://blog.damiles.com/assets/2012/03/DSC_0370.jpg"><img class="aligncenter size-full wp-image-355" title="DSC_0370" src="http://blog.damiles.com/assets/2012/03/DSC_0370.jpg" alt="" width="560" height="530" /></a></p>
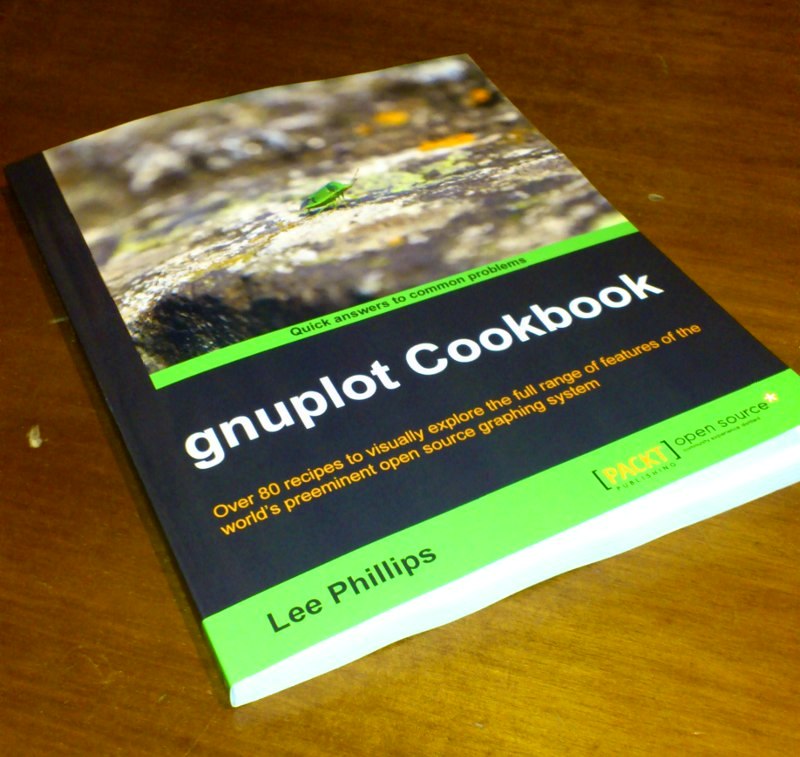
<p>I'm very happy, Gnuplot cookbook arrive to my hands. I had the pleasure to review this great book.</p>

<p style="text-align: center;"><a href="http://blog.damiles.com/assets/2012/03/DSC_0371.jpg"><img class="aligncenter size-full wp-image-356" title="DSC_0371" src="http://blog.damiles.com/assets/2012/03/DSC_0371.jpg" alt="" width="288" height="331" /></a></p>
<p>Any engineer  that  need make profesional plots this book help to create it.</p>
<p>There are basic concepts to advanced concpets as 3d plots, labeling, multiplot, latex include plots, scripting and language programing with gnuplot...</p>
<p>I recommend this book.</p>
<p>You can buy it in <a href="http://www.packtpub.com/gnuplot-visual-guide-with-plotting-software-cookbook/book" target="_blank">packpublishing</a></p>]]></content><author><name>{&quot;display_name&quot;=&gt;&quot;damiles&quot;, &quot;login&quot;=&gt;&quot;admin&quot;, &quot;email&quot;=&gt;&quot;david.millan@damiles.com&quot;, &quot;url&quot;=&gt;&quot;&quot;}</name><email>david.millan@damiles.com</email></author><summary type="html"><![CDATA[I'm very happy, Gnuplot cookbook arrive to my hands. I had the pleasure to review this great book.]]></summary></entry><entry><title type="html">Removing .svn folders from project</title><link href="http://blog.damiles.com/2011/06/02/removing-svn-folders-from-project.html" rel="alternate" type="text/html" title="Removing .svn folders from project" /><published>2011-06-02T16:49:27+00:00</published><updated>2011-06-02T16:49:27+00:00</updated><id>http://blog.damiles.com/2011/06/02/removing-svn-folders-from-project</id><content type="html" xml:base="http://blog.damiles.com/2011/06/02/removing-svn-folders-from-project.html"><![CDATA[<p>A loft of times some people send me project with subversion, and when you  upload to production, sometime you don't want upload .svn folder, looking for in google i found this. A good miracle command for me XD, and sure a stupid command for a lot of people.</p>
<p><span style="font-family: Consolas, Monaco, 'Courier New', Courier, monospace; font-size: 12px; line-height: 18px; white-space: pre;">rsync -r --exclude=.svn /home/user/progname/ /home/user/progname.copy</span></p>]]></content><author><name>{&quot;display_name&quot;=&gt;&quot;damiles&quot;, &quot;login&quot;=&gt;&quot;admin&quot;, &quot;email&quot;=&gt;&quot;david.millan@damiles.com&quot;, &quot;url&quot;=&gt;&quot;&quot;}</name><email>david.millan@damiles.com</email></author><summary type="html"><![CDATA[A loft of times some people send me project with subversion, and when you  upload to production, sometime you don't want upload .svn folder, looking for in google i found this. A good miracle command for me XD, and sure a stupid command for a lot of people. rsync -r --exclude=.svn /home/user/progname/ /home/user/progname.copy]]></summary></entry><entry><title type="html">Segmentation and feature extraction. Contours and blob detection.</title><link href="http://blog.damiles.com/2010/12/20/segmentation-and-feature-extraction-contours-and-blob-detection.html" rel="alternate" type="text/html" title="Segmentation and feature extraction. Contours and blob detection." /><published>2010-12-20T16:14:45+00:00</published><updated>2010-12-20T16:14:45+00:00</updated><id>http://blog.damiles.com/2010/12/20/segmentation-and-feature-extraction-contours-and-blob-detection</id><content type="html" xml:base="http://blog.damiles.com/2010/12/20/segmentation-and-feature-extraction-contours-and-blob-detection.html"><![CDATA[<p>In BasiOCR tutorial i explain  how to preprocess, extract features and clasify a handwritten number, and a lot of people ask me how to segment an image where contains several numbers or objects.</p>
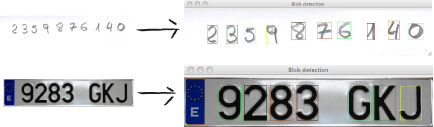
<p>In this tutorial I want explain how to segment an image and detect each object inside image, in this tutorial we can detect objects from plate (the numbers) or each object draw into a paper.</p>

<p><a href="http://blog.damiles.com/assets/2010/12/result.jpg"><img class="aligncenter size-full wp-image-295" title="result" src="http://blog.damiles.com/assets/2010/12/result.jpg" alt="" width="434" height="127" /></a><!--more--></p>
<p>We can define three steps to do this task: preprocess image, find countours, and calculate bounding rect. With this three steps we have each object separatly and then we can use each object to classify it with basicocr sample.</p>
<p>For preprocessing task we use:</p>
<ol>
<li>Smooth filter to simple noise elimination.</li>
<li>Threshold image to get binary image</li>
<li>Morphologic filter, erode and dilate to eliminate noise.</li>
</ol>
<p><a href="http://blog.localhost//wp-content/uploads/2010/12/preprocess_seg.png"><img title="preprocess segmentation" src="http://blog.localhost//wp-content/uploads/2010/12/preprocess_seg.png" alt="" width="421" height="480" /></a></p>
<p>Once we have preprocessed our input image we look for the contours in our binary image with cvFindContours, and optimize its with approxpoly.</p>
<figure class="highlight"><pre><code class="language-c--" data-lang="c++"><span class="c1">//Search countours in preprocesed image</span>
 <span class="n">cvFindContours</span><span class="p">(</span> <span class="n">img_contornos</span><span class="p">,</span> <span class="n">storage</span><span class="p">,</span> <span class="o">&amp;</span><span class="n">amp</span><span class="p">;</span><span class="n">contour</span><span class="p">,</span> <span class="k">sizeof</span><span class="p">(</span><span class="n">CvContour</span><span class="p">),</span>
 <span class="n">CV_RETR_EXTERNAL</span><span class="p">,</span> <span class="n">CV_CHAIN_APPROX_SIMPLE</span><span class="p">,</span> <span class="n">cvPoint</span><span class="p">(</span><span class="mi">0</span><span class="p">,</span> <span class="mi">0</span><span class="p">)</span> <span class="p">);</span>
 <span class="c1">//Optimize contours, reduce points</span>
 <span class="n">contourLow</span><span class="o">=</span><span class="n">cvApproxPoly</span><span class="p">(</span><span class="n">contour</span><span class="p">,</span> <span class="k">sizeof</span><span class="p">(</span><span class="n">CvContour</span><span class="p">),</span> <span class="n">storage</span><span class="p">,</span><span class="n">CV_POLY_APPROX_DP</span><span class="p">,</span><span class="mi">1</span><span class="p">,</span><span class="mi">1</span><span class="p">);</span></code></pre></figure>
<p>Then for each searched contour we calculate the bounding rect.</p>
<figure class="highlight"><pre><code class="language-c--" data-lang="c++"><span class="c1">//For each contour found</span>
 <span class="k">for</span><span class="p">(</span> <span class="p">;</span> <span class="n">contourLow</span> <span class="o">!=</span> <span class="mi">0</span><span class="p">;</span> <span class="n">contourLow</span> <span class="o">=</span> <span class="n">contourLow</span><span class="o">-&amp;</span><span class="n">gt</span><span class="p">;</span><span class="n">h_next</span> <span class="p">)</span>
 <span class="p">{</span>
<span class="p">...</span>
<span class="n">CvRect</span> <span class="n">rect</span><span class="p">;</span>
<span class="n">rect</span><span class="o">=</span><span class="n">cvBoundingRect</span><span class="p">(</span><span class="n">contourLow</span><span class="p">,</span> <span class="nb">NULL</span><span class="p">);</span></code></pre></figure>
<p>We can now draw his contour and/or bounding rect.</p>
<figure class="highlight"><pre><code class="language-c--" data-lang="c++"><span class="n">pt1</span><span class="p">.</span><span class="n">x</span> <span class="o">=</span> <span class="n">rect</span><span class="p">.</span><span class="n">x</span><span class="p">;</span>
<span class="n">pt2</span><span class="p">.</span><span class="n">x</span> <span class="o">=</span> <span class="p">(</span><span class="n">rect</span><span class="p">.</span><span class="n">x</span><span class="o">+</span><span class="n">rect</span><span class="p">.</span><span class="n">width</span><span class="p">);</span>
<span class="n">pt1</span><span class="p">.</span><span class="n">y</span> <span class="o">=</span> <span class="n">rect</span><span class="p">.</span><span class="n">y</span><span class="p">;</span>
<span class="n">pt2</span><span class="p">.</span><span class="n">y</span> <span class="o">=</span> <span class="p">(</span><span class="n">rect</span><span class="p">.</span><span class="n">y</span><span class="o">+</span><span class="n">rect</span><span class="p">.</span><span class="n">height</span><span class="p">);</span>
<span class="n">cvRectangle</span><span class="p">(</span><span class="n">imagen_color</span><span class="p">,</span> <span class="n">pt1</span><span class="p">,</span><span class="n">pt2</span><span class="p">,</span> <span class="n">color</span><span class="p">,</span> <span class="mi">1</span><span class="p">,</span> <span class="mi">8</span><span class="p">,</span> <span class="mi">0</span><span class="p">);</span>
<span class="c1">//or</span>
<span class="n">cvDrawContours</span><span class="p">(</span> <span class="n">imagen_color</span><span class="p">,</span> <span class="n">contourLow</span><span class="p">,</span> <span class="n">color</span><span class="p">,</span> <span class="n">color</span><span class="p">,</span> <span class="o">-</span><span class="mi">1</span><span class="p">,</span> <span class="mi">0</span><span class="p">,</span> <span class="mi">8</span><span class="p">,</span> <span class="n">cvPoint</span><span class="p">(</span><span class="mi">0</span><span class="p">,</span><span class="mi">0</span><span class="p">)</span> <span class="p">);</span></code></pre></figure>
<p style="text-align: center;"><a href="http://blog.damiles.com/assets/2010/12/result1.png"><img class="aligncenter size-full wp-image-301" title="segmentation result" src="http://blog.damiles.com/assets/2010/12/result1.png" alt="" width="446" height="89" /></a></p>
<p>Now we have each object differenciate, now we can use this to get characteristics to classificate, for example  the 7 invariant hu moments.</p>
<figure class="highlight"><pre><code class="language-c--" data-lang="c++"><span class="n">CvMoments</span> <span class="n">moments</span><span class="p">;</span>
<span class="n">CvHuMoments</span> <span class="n">humoments</span><span class="p">;</span>

<span class="c1">//First calculate object moments</span>
<span class="n">cvMoments</span><span class="p">(</span><span class="n">contourLow</span><span class="p">,</span> <span class="o">&amp;</span><span class="n">moments</span><span class="p">,</span> <span class="mi">0</span><span class="p">);</span>
<span class="c1">//Now calculate hu moments</span>
<span class="n">cvGetHuMoments</span><span class="p">(</span><span class="o">&amp;</span><span class="n">moments</span><span class="p">,</span> <span class="o">&amp;</span><span class="n">humoments</span><span class="p">);</span></code></pre></figure>
<p><a class="download" href="https://github.com/damiles/Segmentation-Tutorial" target="_blank">Download source from GitHub</a></p>]]></content><author><name>{&quot;display_name&quot;=&gt;&quot;damiles&quot;, &quot;login&quot;=&gt;&quot;admin&quot;, &quot;email&quot;=&gt;&quot;david.millan@damiles.com&quot;, &quot;url&quot;=&gt;&quot;&quot;}</name><email>david.millan@damiles.com</email></author><summary type="html"><![CDATA[In BasiOCR tutorial i explain  how to preprocess, extract features and clasify a handwritten number, and a lot of people ask me how to segment an image where contains several numbers or objects. In this tutorial I want explain how to segment an image and detect each object inside image, in this tutorial we can detect objects from plate (the numbers) or each object draw into a paper.]]></summary></entry><entry><title type="html">OpenCV and CMake</title><link href="http://blog.damiles.com/2010/09/14/opencv-and-cmake.html" rel="alternate" type="text/html" title="OpenCV and CMake" /><published>2010-09-14T12:42:11+00:00</published><updated>2010-09-14T12:42:11+00:00</updated><id>http://blog.damiles.com/2010/09/14/opencv-and-cmake</id><content type="html" xml:base="http://blog.damiles.com/2010/09/14/opencv-and-cmake.html"><![CDATA[<p><a href="http://blog.damiles.com/assets/2010/09/opencvcmake.png"><img class="aligncenter size-full wp-image-308" title="opencvcmake" src="http://blog.damiles.com/assets/2010/09/opencvcmake.png" alt="" width="645" height="240" /></a></p>
<p>From OpenCV 2.1 version we can use CMake to create and manage our OpenCV projects.</p>
<p><a title="CMake" href="http://www.cmake.org/" target="_blank">CMake</a> is a cross-platform and open-source build system, and it's used to control our compilation process, using a simple text files for define compilation process with independent platform and compiler.</p>

<p>Thanks to CMake we can create our project in our operating system as linux compile and work in it, and then use it to compile a new version in other os as windows, osx, ..., even create a visual studio project, xcode project or eclipse.</p>
<p>To create a basic project with 1 main.c file with cmake and opencv we must create a new file called CMakeList.txt.<br />
<!--more--><br />
In this file we go to define the compiler process and his requeriments.</p>
<p>First we need create a project name:</p>
<figure class="highlight"><pre><code class="language-c--" data-lang="c++"><span class="n">PROJECT</span><span class="p">(</span> <span class="n">project_name</span> <span class="p">)</span></code></pre></figure>
<p>We need find OpenCV libraries. OpenCV is required by our project and it's defined with REQUIRED statement:</p>
<figure class="highlight"><pre><code class="language-c--" data-lang="c++"><span class="n">FIND_PACKAGE</span><span class="p">(</span> <span class="n">OpenCV</span> <span class="n">REQUIRED</span> <span class="p">)</span></code></pre></figure>
<p>Then we must defined our executable, his  name and the dependent files, in our example only main.c, and we go to use the project name for the executable name. This name is stored in ${PROJECT_NAME} variable.</p>
<figure class="highlight"><pre><code class="language-c--" data-lang="c++"><span class="n">ADD_EXECUTABLE</span><span class="p">(</span> <span class="err">$</span><span class="p">{</span><span class="n">PROJECT_NAME</span><span class="p">}</span> <span class="n">main</span><span class="p">.</span><span class="n">c</span> <span class="p">)</span></code></pre></figure>
<p>To finish, we must link OpenCV to our executable, to do this only need call TARGET_LINK_LIBRARIES statement, with the project name and OpenCV library.</p>
<figure class="highlight"><pre><code class="language-c--" data-lang="c++"><span class="n">TARGET_LINK_LIBRARIES</span><span class="p">(</span> <span class="err">$</span><span class="p">{</span><span class="n">PROJECT_NAME</span><span class="p">}</span> <span class="p">{</span><span class="n">OpenCV_LIBS</span><span class="p">}</span> <span class="p">)</span></code></pre></figure>
<p>The CMakeList.txt was defined, then we can compile our project. To do this only need create a directory where we want get our executable. Then  we call cmake with the directory where  CMakeList.txt and main.c files are saved.</p>
<p>When cmake finish whe can call make to compile our project under unix.</p>
<p>If we want create a VisualStudio project under Windows, only need open CMake Gui and select the source code and build directories and cmake detect our visualstudio version and with generate button create our VisualStudio project.</p>
<p>Sample Code:</p>
<figure class="highlight"><pre><code class="language-c--" data-lang="c++"><span class="n">PROJECT</span><span class="p">(</span> <span class="n">Nombre_del_proyecto</span> <span class="p">)</span>
<span class="n">FIND_PACKAGE</span><span class="p">(</span> <span class="n">OpenCV</span> <span class="n">REQUIRED</span> <span class="p">)</span>
<span class="n">ADD_EXECUTABLE</span><span class="p">(</span> <span class="err">$</span><span class="p">{</span><span class="n">PROJECT_NAME</span><span class="p">}</span> <span class="n">main</span><span class="p">.</span><span class="n">c</span> <span class="p">)</span>
<span class="n">TARGET_LINK_LIBRARIES</span><span class="p">(</span> <span class="err">$</span><span class="p">{</span><span class="n">PROJECT_NAME</span><span class="p">}</span> <span class="p">{</span><span class="n">OpenCV_LIBS</span><span class="p">}</span> <span class="p">)</span></code></pre></figure>]]></content><author><name>{&quot;display_name&quot;=&gt;&quot;damiles&quot;, &quot;login&quot;=&gt;&quot;admin&quot;, &quot;email&quot;=&gt;&quot;david.millan@damiles.com&quot;, &quot;url&quot;=&gt;&quot;&quot;}</name><email>david.millan@damiles.com</email></author><summary type="html"><![CDATA[From OpenCV 2.1 version we can use CMake to create and manage our OpenCV projects. CMake is a cross-platform and open-source build system, and it's used to control our compilation process, using a simple text files for define compilation process with independent platform and compiler.]]></summary></entry><entry><title type="html">CvFileStorage. How to save our custom structures with OpenCV functions</title><link href="http://blog.damiles.com/2010/02/10/cvfilestorage-how-to-save-our-custom-structures-with-opencv-functions.html" rel="alternate" type="text/html" title="CvFileStorage. How to save our custom structures with OpenCV functions" /><published>2010-02-10T15:29:54+00:00</published><updated>2010-02-10T15:29:54+00:00</updated><id>http://blog.damiles.com/2010/02/10/cvfilestorage-how-to-save-our-custom-structures-with-opencv-functions</id><content type="html" xml:base="http://blog.damiles.com/2010/02/10/cvfilestorage-how-to-save-our-custom-structures-with-opencv-functions.html"><![CDATA[<p><a href="http://blog.damiles.com/assets/2010/02/opencvGeneric.png"><img class="size-full wp-image-311" title="opencvGeneric" src="http://blog.damiles.com/assets/2010/02/opencvGeneric.png" alt="OpenCV" width="645" height="240" /></a></p>
<p>In this tutorial we go to show how to save our custom structures with opencv functions.</p>

<p>We go to imagine we have this structure in our program.</p>

<figure class="highlight"><pre><code class="language-c--" data-lang="c++"><span class="k">typedef</span> <span class="k">struct</span>
<span class="p">{</span>
<span class="kt">float</span> <span class="n">var1</span><span class="p">;</span>
<span class="kt">unsigned</span> <span class="kt">char</span> <span class="n">var2</span><span class="p">[</span><span class="mi">255</span><span class="p">];</span>
<span class="p">}</span><span class="n">MyStructure</span><span class="p">;</span></code></pre></figure>

<p>Opencv can save data in two formats: XML or YAML. This formats are markup languages.</p>

<p>For write or read a file, we go to use cvOpenFileStorage function, the functions returns  a CvFileStorage structure pointer. This pointer we use to read or write values into.</p>

<p>We can open a file in two ways: for read or write. The function to open file is cvOpenFileStorage</p>

<figure class="highlight"><pre><code class="language-c--" data-lang="c++"><span class="n">CvFileStorage</span><span class="o">*</span> <span class="n">storage</span> <span class="o">=</span> <span class="n">cvOpenFileStorage</span><span class="p">(</span> <span class="n">file</span><span class="p">,</span> <span class="mi">0</span><span class="p">,</span> <span class="n">CV_STORAGE_WRITE_TEXT</span> <span class="p">);</span></code></pre></figure>

<p>One time we have our CvFileStorage initialized then we can save our data. To save the data we need create Nodes. XML and YAML are markup languages, and they are defined with nodes.</p>

<p>First we go to create one node that contains all structure data. And inside of this node we need create one node for each variable.</p>

<p>For create a node we need open and close this node, as we do with xml, then we use cvStartWriteStruct and cvEndWriteStruct.</p>

<figure class="highlight"><pre><code class="language-c--" data-lang="c++"><span class="n">cvStartWriteStruct</span><span class="p">(</span><span class="n">storage</span><span class="p">,</span> <span class="s">"MyStructure"</span><span class="p">,</span> <span class="n">CV_NODE_MAP</span><span class="p">,</span> <span class="nb">NULL</span><span class="p">,</span> <span class="n">cvAttrList</span><span class="p">(</span><span class="mi">0</span><span class="p">,</span><span class="mi">0</span><span class="p">));</span>
<span class="p">...</span>
<span class="n">cvEndWriteStruct</span><span class="p">(</span><span class="n">storage</span><span class="p">);</span></code></pre></figure>

<p>Between the start and end node we go to insert each new node with asigned variable. The variable we must save as some of this types: int, raw (array), real or string with this functions:</p>

<p>cvWriteInt
cvWriteRawData
cvWriteReal
cvWriteString
Then for save our structure we go to create this code:</p>

<figure class="highlight"><pre><code class="language-c--" data-lang="c++"><span class="c1">//Open file</span>
<span class="n">CvFileStorage</span><span class="o">*</span> <span class="n">storage</span> <span class="o">=</span> <span class="n">cvOpenFileStorage</span><span class="p">(</span> <span class="n">file</span><span class="p">,</span> <span class="mi">0</span><span class="p">,</span> <span class="n">CV_STORAGE_WRITE_TEXT</span> <span class="p">);</span>
<span class="c1">//Create our node for structure</span>
<span class="n">cvStartWriteStruct</span><span class="p">(</span><span class="n">storage</span><span class="p">,</span> <span class="s">"MyStructure"</span><span class="p">,</span> <span class="n">CV_NODE_MAP</span><span class="p">,</span> <span class="nb">NULL</span><span class="p">,</span> <span class="n">cvAttrList</span><span class="p">(</span><span class="mi">0</span><span class="p">,</span><span class="mi">0</span><span class="p">));</span>
<span class="c1">//Write our float</span>
<span class="n">cvWriteReal</span><span class="p">(</span> <span class="n">storage</span><span class="p">,</span> <span class="s">"var1"</span><span class="p">,</span> <span class="n">MyStructure</span><span class="o">-&gt;</span><span class="n">var1</span> <span class="p">);</span>

<span class="c1">//Write our array</span>
<span class="n">cvStartWriteStruct</span><span class="p">(</span><span class="n">storage</span><span class="p">,</span> <span class="s">"var2"</span><span class="p">,</span> <span class="n">CV_NODE_SEQ</span><span class="p">,</span> <span class="nb">NULL</span><span class="p">,</span> <span class="n">cvAttrList</span><span class="p">(</span><span class="mi">0</span><span class="p">,</span><span class="mi">0</span><span class="p">));</span>
<span class="n">cvWriteRawData</span><span class="p">(</span><span class="n">storage</span><span class="p">,</span> <span class="n">MyStructure</span><span class="o">-&gt;</span><span class="n">var2</span><span class="p">,</span><span class="mi">255</span><span class="p">,</span><span class="s">"u"</span><span class="p">);</span>
<span class="n">cvEndWriteStruct</span><span class="p">(</span><span class="n">storage</span><span class="p">);</span>

<span class="c1">//End node structure</span>
<span class="n">cvEndWriteStruct</span><span class="p">(</span><span class="n">storage</span><span class="p">);</span></code></pre></figure>]]></content><author><name>{&quot;display_name&quot;=&gt;&quot;damiles&quot;, &quot;login&quot;=&gt;&quot;admin&quot;, &quot;email&quot;=&gt;&quot;david.millan@damiles.com&quot;, &quot;url&quot;=&gt;&quot;&quot;}</name><email>david.millan@damiles.com</email></author><summary type="html"><![CDATA[In this tutorial we go to show how to save our custom structures with opencv functions.]]></summary></entry><entry><title type="html">Pseudocolor implementation with OpenCV.</title><link href="http://blog.damiles.com/2010/01/28/pseudocolor-implementation-with-opencv.html" rel="alternate" type="text/html" title="Pseudocolor implementation with OpenCV." /><published>2010-01-28T22:19:56+00:00</published><updated>2010-01-28T22:19:56+00:00</updated><id>http://blog.damiles.com/2010/01/28/pseudocolor-implementation-with-opencv</id><content type="html" xml:base="http://blog.damiles.com/2010/01/28/pseudocolor-implementation-with-opencv.html"><![CDATA[<p>In Computer Vision works in a lot of cases with gray images because there are a lot of motives. But human vision don't perceives the gray levels so well as color levels.</p>
<p>Then if we need show a image to a person, we can color it. But, how is the best way to coloring gray image?</p>
<p>There are 3 ways to do it: Manually, automatically and colored by ranges.</p>

<p>In this tutorial, i go to develop the way most common automatic for gray image coloring.</p>
<p>To do it we need know we go to receive a gray level and we need return 3 values, one for red, one for blue and other for green.</p>
<p>We go to use this function:</p>
<p>$$ \displaystyle{ s(x,y)=\vert sin(r(x,y)*p*PI + \Theta*PI)\vert}$$</p>
<p>And r(x,y) is the gray level and p is the number of repetitions and $ \displaystyle{ \Theta }$ is the displacement.</p>
<p>Then we only need define the p and $ \displaystyle{ \Theta }$ for each channel.</p>
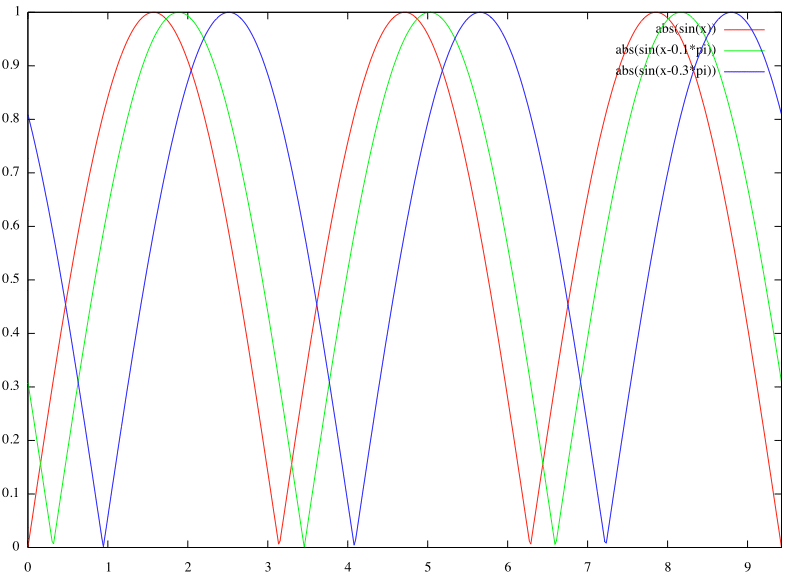
<p>If we create a plot with this function with this parameters for red, green and blue ((2,0),(2,-0.1),(2,-0.3)) we get:</p>
<p>Pseudocolor Graph with red(p=2,theta=0) green(2,-0.1) and blue(2,-0.3)<a href="http://blog.damiles.com/assets/2010/01/graph.gif"><img class="size-medium wp-image-253 " title="graph" src="http://blog.damiles.com/assets/2010/01/graph-300x218.gif" alt="Pseudocolor Graph" width="300" height="218" /></a></p>
<p>Then we only need set the gray level in range 0 to 1 and the sine returns values from 0 to 1 we interpret as float image values or we set in range 0 to 255.</p>
<p>To finish this is the result:</p>
<p><a href="http://blog.damiles.com/assets/2010/01/pseudocolor.jpg"><img class="size-medium wp-image-255" title="pseudocolor" src="http://blog.damiles.com/assets/2010/01/pseudocolor-300x238.jpg" alt="Pseudocolor Result" width="387" height="308" /></a></p>
<p><a title="Code" href="https://github.com/damiles/opencv-pseudocolor" target="_blank">Download the code.</a></p>]]></content><author><name>{&quot;display_name&quot;=&gt;&quot;damiles&quot;, &quot;login&quot;=&gt;&quot;admin&quot;, &quot;email&quot;=&gt;&quot;david.millan@damiles.com&quot;, &quot;url&quot;=&gt;&quot;&quot;}</name><email>david.millan@damiles.com</email></author><summary type="html"><![CDATA[In Computer Vision works in a lot of cases with gray images because there are a lot of motives. But human vision don't perceives the gray levels so well as color levels. Then if we need show a image to a person, we can color it. But, how is the best way to coloring gray image? There are 3 ways to do it: Manually, automatically and colored by ranges.]]></summary></entry></feed>